Tuesday, March 4, 2014

Art across the Curriculum / History :Presidents Day Symmetry Lesson

 In art class we have been talking and exploring the subject of symmetry.

For this lesson we have used the Historical of Lesson of Presidents Day.

Usually , we discuss two presidents: George Washington and Abrahamn Lincoln.

We discuss atleast three facts about Mr. Lincoln:

He was the 16th President of the United states.

He was a self taught person, from a Young boy he was himself many things by reading.

He  Wrote the Emancipation Proclamation: Freedom for the Slaves.

When we learn about George Washington , we discusss three things.

He was our first President.

He was our First General of our Army.

And he Signed the Declaration of Independence.


Then we review our Symmetry by discussing a mirror image with examples.

Use examples, such as shapes and butterflies.

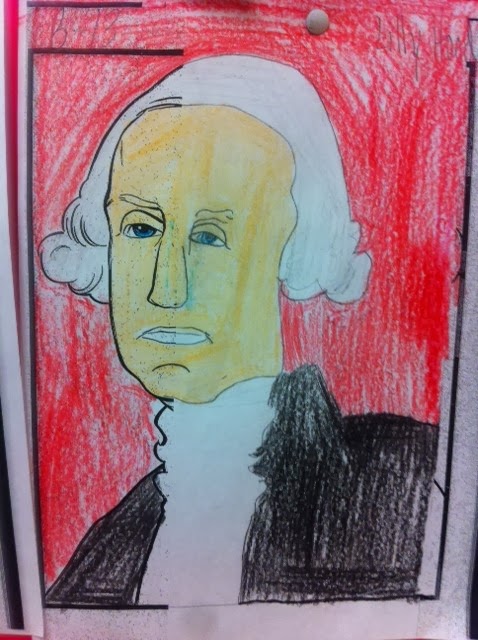
I them give them a print off of a portrait of Washington or Lincoln, with the other side masked out . Examples


 The Children took these half portraits and drew the symmetry of the president face.
 
 
Some did so good they were all very pleased.
 
I could only save the George Washington pictures because the 3rd grade teachers wanted  place their Abrahamn Lincoln on their wall.
 
 
Here are the samples:
hope you like them.


Friday, December 16, 2011

Literacy-- Descriptive Writing and Skyscrapers

In this lesson the students had to draw a Skyscraper. They used vertical lines, horizontal, diagonal and perpendicular lines to draw the skyscraper. They learned that a skyscraper was a very tall building used for many things in many places. When the children drew the skyscraper they had to place the building in any chosen area.  Some hints you can give the children are; Phoenix Arizona with a back ground of the desert, Colorado with a back ground of  mountains.New York with a cityscape, Dallas, Texas with a background of a cow paster, or Miami Florida with a background of the ocean.
Materials needed:
Paper,
 Ruler optional
Pencil
crayons
or colored pencil.
After drawing the lesson the students will write a descriptive  paragraph about the picture.
The students  will discuss the following criteria and will have to place these things in their  writing.
1. A topic sentence = about the picture preferrably a declarative- statement
2. 2-3 Descriptors= describing the building, color, height, what is its purpose, or what it is made of.
3.Closing statement. one sentence = statement or opinion

Each child will write the paragraph and then revise.
Revision process:
1. Captialization and punctuation.
2. All words are in the sentence . And the sentence makes sense.
3. All criteria is in the sentence.

Please look at the  following and see the drawing illustration process and examples of pictures students
drew.


Friday, December 9, 2011

1940-50's Diner and Perpendicular Lines

In this art lesson we have students draw a 1940's-50"s diner using perpendicular lines  to create space.

With this lesson you can also relate it to past and present learning through the fact that Fast food business's use the designs that diners introduced many years ago.This lesson will reinforce depth in your picture and the Math consepts of perpendicular lines  alosn with parell lines
The children will also use parellel lines with this drawing.
Materials:
Pencil
Ruler optional
paper 81/2 X 11
colored pencils or crayons

1st Step :
Students will draw a vertical line. Then from the top and bottom of this line they will draw two diagonal lines
going the opposite direction.
Let the children undersand that these perpendicular lines will at the other end (or beginning) eventually intersect as a line ray .
Then draw another vertical line  on the right side of the first line.

Go back and decorate the windows and walls in this shape.

2nd step:
At the top and bottom of the second line draw two more diagonal lines that could eventually intersect.
These are the perpendicular lines.
On this section make  a front door by drawing two vertical lines in the middle of this section.
Then go back and create windows , shades,  and wall with vertical lines.

3rd step:
 This Step we will draw the stairs and parking lot.
The steps are created by two short diagonal lines in front of the door. Then two vertical lines from each diagonal line.
In the diagram you will draw a horizontal, vertical , horizontal and vertical line . Mirror this image next to the building.
Then dconnect the corners with diagonal lines.

Also draw vertical lines on the bottom corners of the building to create a cover tha eleviate the diner to the stairs.

This lesson not only teaches about perpendicular you can emphasis some parrelel lines in the drawing
instructions as well.
Have the students color their diner and  have a good time drawing.


Here are some drawings by my 5th graders:


Thursday, December 8, 2011

Collage of Perimeter and Area = MATH AND ART

In this ART Lesson Students were asked to make a collage of a football  field and display the measurements in perimeter and area

Materials:
9X12 white paper
black marker\
1 piece of green contruction 4X10
2 Pieces of brown construction paper 4X 3
glue /ruler

Students  are told the football field is divided into  12 lines  resembling 10 yards.They will have to measure
the greeen construction paper and divide  it by twelve even sections.
This will create 6 sections of ten yards ,with one section being the goal yard.
paste the green to your white paper vertically, after you have labeled the green field
Then cut out your goal post with the brown, Draw the goal post first then cut it out.

After every thing is glued, find the perimeter of the football field by adding all the 10 yard lines
perimeter = length + length+ width+ width.
Have students transfer the yardage into feet.

Then have the students find the area
area= length X width
 Transfer the  yardage in to feet
Here are some pictures of students works.
MAKE SURE ALL MEASUREMENTS ARE LABELED and  problems are written on paper


Glue and bend post vertical at the end of the football field  on the  paper as shown.